So are you ready for another tutorial? I thought I would begin to talk today about blending modes. I think learning to work with blending modes in different layers is what makes Photoshop a fun program; it will also give you a lot of flexibility in your art and photo editing.
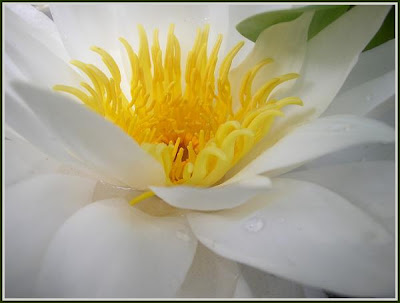
First I started with these two images from wetcanvas


I hope that by next week's tutorial I will have figured out how to post larger screen shots on Blogger. If you want to look at these images in more detail, please click on them to see the larger format.
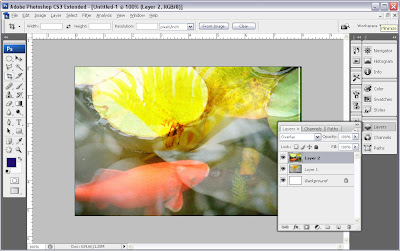
 1. First I created a new canvas (Ctrl/Cmd+ N or File> New) and moved both images by dragging and dropping them using the Move tool (press V) on to the new canvas. From the layer palette you can see that I stacked the goldfish image on top of the water lily; then I set the blending mode to Overlay.
 2. Here is a close up of the layer palette. I have pointed to the blending mode window, in case you weren't sure where it was. If you click on the drop down menu, you can see all the different blending mode choices. There are many books and resources available that explain better than I can how these blending modes work. I am partial to the writing of Ben Willmore, and suggest you check him out for more in depth explanations. Not only does he know his stuff, but he writes in an engaging manner that makes learning Photoshop fun.
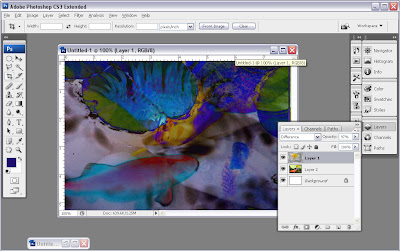
 3. I wanted to do a little more experimenting before I decided how to proceed, so I reversed the layer order and put the water lily on top of the goldfish in the layer stacking order, and I changed the blending mode on the water lily layer to Difference. I like the moody affect, but decide I'd rather go for a more traditional orange gold fish look.
 4. I moved the two layers back to their original positions, set the blending mode on the top layer back to Overlay and created a layer mask. I did this so parts of the gold fish image would be blocked out (masked), thus revealing parts of the water lily image from the layer below. If you click on this image you can see in greater detail how this layer mask works. Where the goldfish layer is painted in black, the water lily is revealed. Remember the basic Photoshop mantra? BLACK REVEALS AND WHITE CONCEALS
 Instead of waiting until next Sunday to finish up this tutorial, I will post part 2 on Tuesday -- when I will talk in more detail about combining blending modes and layer masks. I really would encourage you to download the two images from wetcanvas and follow along with this tutorial. Oh, and if you want to see where I took this image after I finished the tutorial, you can see them at my other blog here.
© Sue O'Kieffe 2007
7 comments:
Ooooh, you're giving me ideas!
Love the fishes on Xanga - very, very much fun (no coffee yet, so no vocabulary either)
Giving people ideas is ...well, the whole idea...
ds
What a great blog, nice to have just discovered you via Tammy's site!
I have been looking for some help to learn photoshop but can't afford the large sums of money demanded by my local college and evening classes. I decided that I needed help for free and Viola here you are! Will set aside some time every day to do this... Thank you so much!
Looking forward to settling down with your tutorials and having a concerted try at them. I have to work very slowly, I realise, instead of intuitively rushing ahead with stuff and realising I must have missed a step somewhere.
Thanks for all this helpful instruction - your time and effort are really appreciated.
Hi Sue, This is fantastic!! Thank you very much. You are a master at those shortcuts for sure.
What beautiful images .. they draw me in. I also relly like the #3 (of course).
Even though I mostly know this, it is very helpful to me to be able to look at your step by step - with pictures and it is going into my being at another level.
Thank you so much ... I will go read the follow-up now.
~ Diane Clancy
www.dianeclancy.com/blog
Sue, this was such fun and so easy instructions. Check out my version and see! What a fun project. Thank you for your time and effort in making these tutorials available to the neophytes like me :)
Sue, found you blog and I'm following now.
Hooray for blending modes! Really well done - and you incorporated the good old Layer Mask. Awesome starter tutorial!
I will add your blog and shop to my blogroll on my blog as well.
Thanks for sharing.
Regards,
-Daniel
Post a Comment