Pages

Saturday, September 29, 2007

WHAT ARE PHOTOSHOP ADJUSTMENT LAYERS?

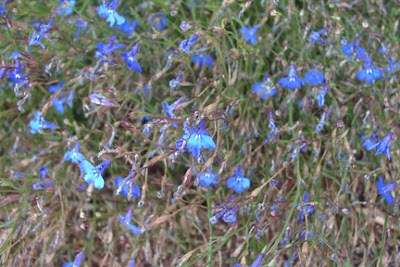
I'm glad to be back after a week's hiatus to offer another tutorial in Photoshop. Today I thought I would talk a little about adjustment layers and the concept of non-destructive image editing. Please feel free to copy this photograph I took of lobelia in order to follow along.


1) There are many different ways to edit your images. First be sure to duplicate your image (Ctrl/Cmd+J) so you will have an original of the image you are editing. Go to Image>Adjustments; you will access a long menu of different adjustment tools. For the purposes of this tutorial, I am going to use the Hue/Saturation adjustment tool.
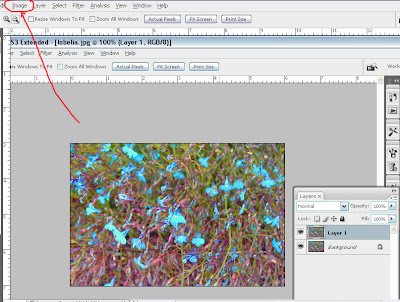
I wanted to see if I could give the flowers in the photograph a little more pop, so I set Hue at -3 and Saturation at +52 and clicked OK. But what if, after working on this image for a while, I wanted to make another adjustment to the color? If you click on the Hue/Saturation tool again, you will see that the settings have all returned to 0. Any further adjustment would be destructive to the layer you are editing. What to do? Let's start over.

Go to Windows>History> click on Open. This will take you back to the beginning. Duplicate the image again.
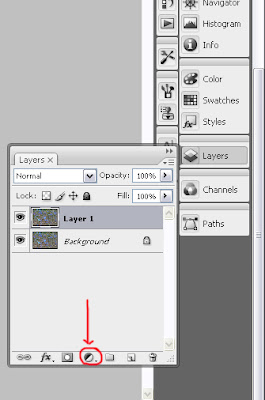
2) If your Layers Palette isn't open, do it now (Windows>Layers). The Layers Palette also contains many different tools. The button I have circled in red creates new adjustment layers. Click it now and you will see the same menu of tools you did before. The difference with adjustment layers is that you can go back and re-edit your adjustments, turn them off and on, delete them, re-create them. This gives you an amazing amount of flexibility in your work.
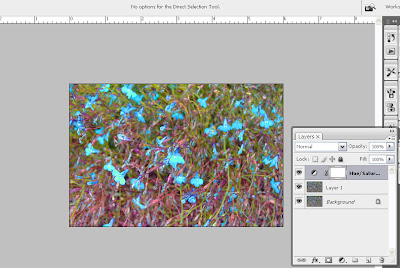

3) Once again, select Hue/Saturation and once again set Hue at -3 /Saturation at+52 and click OK. Now click on the Hue/Saturation adjustment layer again. You will see that the H/S settings are -3/+52. Change them to -8/+42 and click OK. As you continue to edit this image, you can go back and make adjustments to these settings as needed.
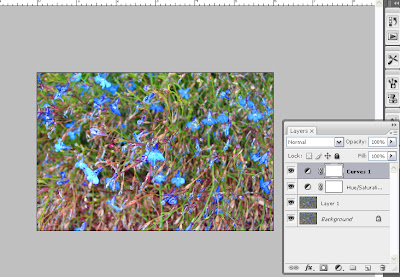

4) Click on the adjustment layer icon again and select Curves. It's OK if you have never used Curves before; for the purpose of this tutorial enter the following adjustments: output 55/input 64.
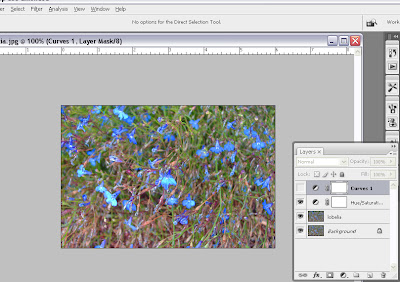
5) Now turn off the Curves adjustment layer by clicking on the eyeball column on the left. Do you like the image better with or without the Curves adjustment?

Have fun playing with adjustment layers. Try other adjustments. See how they look. Try them with different blending modes. Experiment. See what happens if you mask out part of the adjustment. Remember that my screen shots might look different from what you see on your monitor, depending on what version of Photoshop you use. The concepts remain the same.

Let me know if you enjoyed this tutorial and how it changes (if it does) the way you edit your images.

Happy Photoshopping, everyone!

© Sue O'Kieffe 2007


Friday, September 28, 2007

VISIONS OF MANDALA MAKERS DANCE IN MY HEAD

AUTUMN FUN - (Seasons Series) - © Sue O'Kieffe 2006


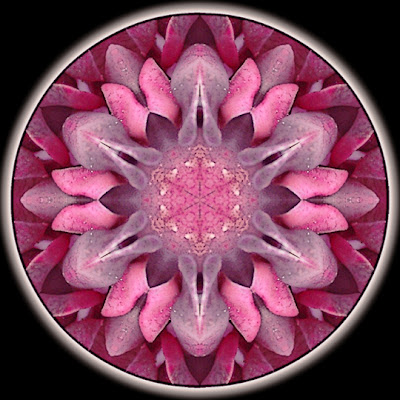
I have looked at the work of many many mandala artists over the past couple of years. If you have a look-see to the right, you will see that I have put up links today to other mandala makers sites that I have found informative, inspiring and beautiful.

When I started to envision going into business with my art, of course issues of competition came up for me; as an artist this is dangerous territory to stay in for very long. About a year ago, after looking at the Gaia Star World site, I had a vision of a world wide community of mandala makers bringing light and healing to the planet. We all have our own vision and voice. There is enough for everyone because there is plenty of need for healing.

I am humbled and pleased that others have felt inspired to begin creating mandalas of their own; and while it is heady for me to be called inspiring, I would encourage this: Find your voice, find your truth, and have fun in what you are doing.

I would love to read your thoughts in commentary.


Tuesday, September 25, 2007

HEALING ART

Vessel of Hope Mandala - (Circles of Light series) - © Sue O'Kieffe 2007

Representing the universe itself, a mandala is both the microcosm and the macrocosm, and we are all part of its intricate design. The mandala is more than an image seen with our eyes; it is an actual moment in time. It can be can be used as a vehicle to explore art, science, religion and life itself. The mandala contains an encyclopedia of the finite and a road map to infinity.
~ from The Mandala Project

As I was creating this mandala, I began to envision a very old container, something that might have been discovered in an archaelogical dig, that was believed to have held herbs steeped in oil used in healing rituals. I imagined that every time the ritual herbs were used, the dis-ease of the person being treated would be returned to the vessel and be alchemically transformed into radiant health.

Carl Jung said that a mandala represents
a safe refuge of inner reconciliation and wholeness. I have long been attracted to mandalas for their healing potential, not only for the viewer but for the creator as well. This mandala was created from a photograph of daffodils for my friend Susan E., who is currently facing medical challenges.

May she be restored to wholeness.

Sunday, September 23, 2007

WE ARE ALL CONNECTED

we are all connectedWe Are All Connected - (Healing in Circles series) - © Sue O'Kieffe 2007

I suspect Diane Clancy has some good skills in persuasion. The enthusiasm with her post on ClusterMaps won me over; you will see I have now added a map to my blog as well. It will be fun to see exactly how we are all connected. Im glad I have an atlas next to my computer, too!

Where are you from?
----------
On another note, the months of wondering, questioning, researching and final decision making regarding my line of mandala greeting cards is about to go to the next level. I will begin taking them to stores this week. If you have never seen my cards, you can view them in my gallery here

Interested in purchase? Email me here for details.
---------------
P.S. I will be back next Sunday with another Photoshop tutorial. Life, as it does at times, won over my best laid plans this week.

Saturday, September 22, 2007

A LITTLE PERSPECTIVE


VARIATIONS ON A THEME - © Sue O'Kieffe circa 2005
Three of my first mandalas
-----------------

TALENT

Talent, in common parlance is "what comes easily." So, sooner or later, inevitably, you reach a point where the work doesn't come easily, and - Aha! It's just as you feared.

Wrong. By definition, whatever you have is exactly what you need to produce your best work. There is probably no clearer waste of psychic energy than worrying about how much talent you have -- and probably no more common.
~
from Art and Fear, Observations on the Perils of Artmaking, David Bayles and Ted Orland:
------------
I must admit I do get queasy when people tell me I am talented. I think it is more than remembering the haunting voice of my mother who told me at 5 I would never be good enough to be an artist.

When we talk about talent, it's as if it is a given rather than the gift that it is. And it's a gift that must be nurtured in order to grow.

I was proud of these first mandalas I created two years ago. I like looking at them now and then to remember creation really is about the journey.
-----------
I will be back next Sunday with another Photoshop tutorial. Life won over my best laid plans this week.


Thursday, September 20, 2007

HOW DO I MAKE MANDALAS?

awakeningAwakening - (Healing in Circles series) - © Sue O'Kieffe 2006

More than one person have asked me how I make my mandalas. It is no secret that I start with the templates offered at earthmandalas.com Komra Moriko wrote those tutorials quite a long time ago, and the way Photoshop is laid out is quite different now; but the concepts are still the same. If you have tried to use those templates and got lost in the tutorial and need some help, let me know.

Starting with a good photograph helps too. When I shoot photographs, I tend to look for flowers that are fleshy and reflect light well. The mandala above, made from a photograph of a rose,and the one yesterday, which was made from a photograph of a succulent, both have lots of substance. I also work with high resolution photographs (240 ppi) which means I duplicated the templates to 240 ppi as well.

My other secret? Lots and lots of practice. I have worked on my art at some point every day for the past two years. This means learning about making adjustments, selections, layers, different filters, blending modes and how they all work together. I would say of all the photoshop tools I use that blending modes is my favorite. I have found that the less "photoshoppy" an image looks, the more I like it. And I keep wondering. What would happen if? I remain willing to break my own rules of creation. And I keep learning and relearning.

And that's how I do it!

Wednesday, September 19, 2007

AN ATTITUDE OF GRATITUDE

heaven's embraceHeaven's Embrace - (Healing in Circles series) - © Sue O'Kieffe 2006

Earlier this week I was honored with more recognition from my fellow community members in the blogosphere. I feel gratified to receive these kindnesses; just to have my basic nature recognized is plenty indeed. Frances at A Carpet Full of Holes not only honored me with An Apple for the Teacher Award, but created the award herself. Bobbie gifted me with the Nice Matters Award. This great grannie is blossoming with her ongoing skills in learning Photoshop. Thanks for this immediate feedback.

For both of you, I offer this up: CLICK HERE

Sunday, September 16, 2007

THIS IS INDEED A QUICK MASK TUTORIAL

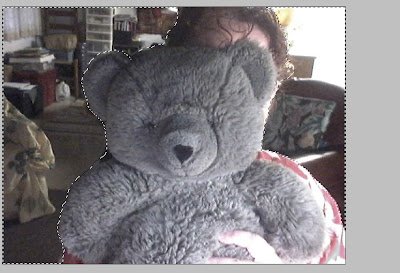
I have invited my favorite bear friend Pearl to be my model for this week's photoshop tutorial on quick masks. Isn't she wonderful?

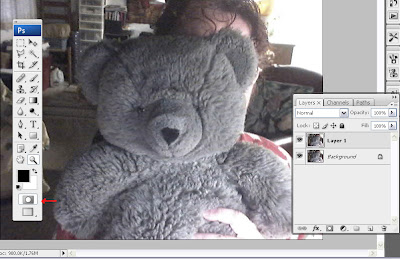
1) There are many ways to make selections in Photoshop. For purposes of this tutorial think of selection making as a way to assist in editing, altering, and changing an area in an image. In this tutorial what I have chosen as my desired end result is to blur out the somewhat distracting background. I am going to do that by choosing quick mask mode and masking out the stuff in the back in order to select it. This will become clearer as we continue, so just bear with me!2) In order to enter into quick mask mode, press Q. You can easily switch back and forth between the two modes by pressing Q back and forth. The quick mask editor button looks a little different depending on which version of Photoshop you are using. Check it out now by pressing Q and you will see the quick mask button lit up and not lit up in the tool window. I have drawn an arrow to its position on the Photoshop CS3 tool window, the version of Photoshop I am using.

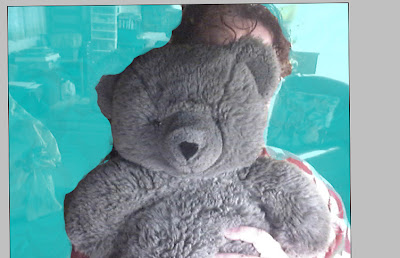
3) Double click on the quick mask mode button. You will see that the default color Photoshop uses for quick masking is red. For this demonstration I chose an aqua blue color for my quick mask because there is red in my blouse. Using blue will make it easier to see where I have painted "outside the lines."
  • Press D to set colors to default(black/white)
  • Press X if black is not the foreground color
  • Press B for the brush tool
  • Press the right ] bracket key to increase the size of your brush and the left( [ ) bracket key to decrease and paint/mask the background.


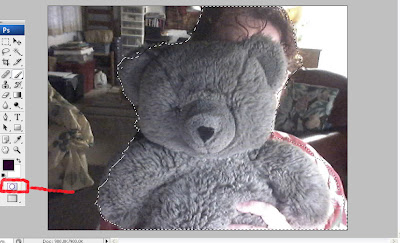
4) Press Q to exit out of quick mask mode. You will see the characteristic marching ants (moving dotted lines) that are associated with selections where you painted in the blue mask. The quick mask window is no longer highlighted either.
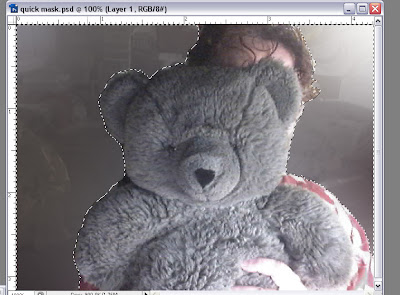
But what if you painted in areas you don't want masked out? Remember the Photoshop mantra -- Black conceals and white reveals --? Press X to set white to the foreground color, press Q to reenter quick mask mode, and paint out the areas you don't want masked. If you look at this image, the area along my left sleeve was painted in blue and I didn't want that masked out. I returned the image to quick mask mode by pressing Q, and painted that and other areas in white that needed to be adjusted.

So, once you have adjusted the mask to the way you want it, press Q again to exit out of the quick mask mode.

5) Remember that what I am wanting to do is blur out the background. It is that area that needs to be surrounded in marching ants. Go to Select> Inverse (Ctrl/Cmd+Shift+I) to accomplish this.


6) Go to Filters>Blur>Gaussian Blur and blur the background to the desired amount by moving the radius setting. I set this at 74.
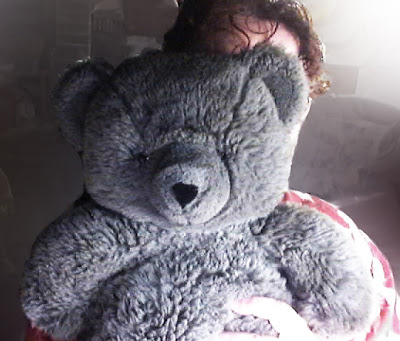
7) Finally, delete the selection (Ctrl/Cmd+D), create a duplicate layer (Ctrl/Cmd+J), and set the blending mode for the duplicated layer to Overlay. Doesn't Pearl look ravishing now?

If you have any questions about this tutorial, leave a comment or email me at the contact address above.


Happy Photoshopping!
© Sue O'Kieffe 2007


Friday, September 14, 2007

I AM A DIGITAL ARTIST

FLEUR LUMINEUSE - (Circles of Light series) - © Sue O'Kieffe 2007
(Thanks to Rima Koleilat for the French lesson and assistance in naming this mandala)

I have been trained and instilled with certain artistic values. One that runs deep is that of non-appropriation, i.e. using other people's images in my artwork. When digital art was in its infancy, one of the criticisms was that people were stealing images from the web and using them as their own. Im sure that is still occurring, given how easy it is to download and save from any person's given website directly to your desktop. I think for a long time digital art was not considered a true art form. Im sure those attitudes are still prevalent in the art community. I am the only digital artist in my Art as Business group.

I remain conscious of only using images for my mandalas that I have photographed myself. Anything I have used that is not mine has been done with the permission of the photographer, and I give that person credit on my greeting cards and the labels that come with my prints. I have spent as much time this spring and summer learning to capture the light in the images I am shooting with my camera as I have in creating their portraits of light in photoshop. It is much easier to create with a good photographic source image than it is trying to heal the source image digitally.

The first time I touched a computer, before there was barely anything known as a Mac or PC, I knew I was home. It took me another 20 years, though, to really walk through the door.
-----------
On Being an Artist: Artmaking involves skills that can be learned. The conventional wisdom is that while "craft" can be taught, "art" remains a magical gift bestowed only by the gods. Not so. In large measure becoming an artist consists of learning to accept yourself, which makes your work personal, and in following your own voice, which makes your work distinctive. Clearly, these qualities can be nurtured by others. Even talent is rarely distinguishable, over the long run, from perseverance and lots of hard work. It's true that every few years the authors encounter some beginning photography student whose first-semester prints appear as finely crafted as any Ansel Adams might have made. And it's true that a natural gift like that...returns priceless encouragement to its maker. But all that has nothing to do with artistic content. Rather it simply points up the fact that most of us (including Adams himself) had to work years to perfect our art.

~ from Art and Fear, David Bayles and Ted Orland
(Credit goes to Tammy Vitale for pointing me to this book. Merci.)

TOMORROW: A PRETTY QUICK TUTORIAL ABOUT QUICK MASKS


Tuesday, September 11, 2007

MANY THANKS

Earth Dance Mandala - (Earth Mysteries Series) - © Sue O'Kieffe 2007
Expressing gratitude is an expansive spiritual practice that allows the flow of life's energy to remain vibrant and alive. I wanted to take some time today to say thank you to a few people out in the blogosphere who have touched my life, influenced my thinking, assisted in my process, and gosh darn it all just made me feel good!

I think I found a link to ArtBizCoach Alyson Stanfield first @ www.theartrepreneur.com back around the beginning of the year, and I have been reading her blog and newsletter ever since. If you have never read her, I would definitely recommend checking her out. Alyson is a great resource of information for learning more about the business of art. I thought her recent post about dissecting what makes a good artist's blog especially thought provoking. Read it and find her recommendations of other artists' blogs to fall in love with. I've already subbed to a couple of them and look forward to reading their stuff!

www.artbizcoach.com
www.artbizblog.com

In accordance with the mystery of the Universe we call the world wide web, I can't remember exactly how I bumped into Tammy Vitale's blog Women, Art, Life: Weaving It All Together. Tammy is also writing about kicking her art business up another notch, as well as showing off her stunning ceramic masks, torsos and beads. She is a woman after my heart, and I enjoy reading about her journey.

My friend Judi Singleton has started a new internet venture on the Law of Attraction. If you have read The Secret or enjoyed the movie What the Bleep, you would probably enjoy her email course on this fascinating topic.

www.newsecretslawofattractions.com

And finally I want to extend a bear hug of gratitude to fellow photoshop adventurers Rima Koleilat of Maraya Galleries and Bobbie of Great Grannie's Blog for letting me know that my photoshop tutorials made sense to them and were easy to follow. Check out their artwork here and here.

Monday, September 10, 2007

BLENDING MODES - PART 2

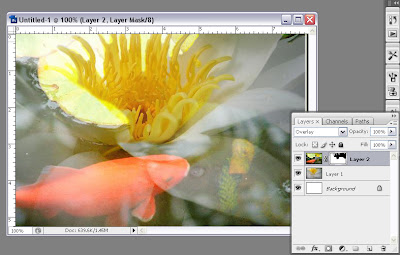
I introduced the concept of layer masks in September 2nd's tutorial. In the tutorial on September 8th, I ended it using a layer mask, and that is where I am picking up for part 2 of this tutorial on blending modes.

1. If you look at Sunday's tutorial, you will see that I started working with this layer mask to play with concealing some of the lily pads. I did this by setting the foreground to black (Press D then X) and painted (or masked) them out the lily pads. BLACK CONCEALS AND WHITE REVEALS, remember? The other thing about working with layer masks that is important to remember is that you are working non-destructively. You can resurrect and restore anything you are not pleased with.
step 1
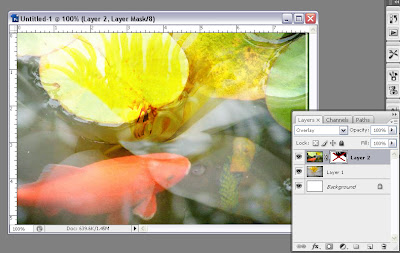
2. I wondered what it would look like if part of the lily pad showed through instead of it being masked out. Press X (which is a toggle key for setting the foreground and background colors) to make white the foreground color, then paint on the lily pad to "erase" the black of the layer mask. But really, you arent erasing as much as you are restoring. You could mask that lilypad again by painting it with black. Is this beginning to make sense now?
step 2
3. Sometimes I don't want to make a decision right away. It's easier just to turn off the mask for a while instead of masking and remasking. You do this by pressing the shift key and clicking on the mask, which is what I did here. (To turn the mask back on, do the same thing).
step 3
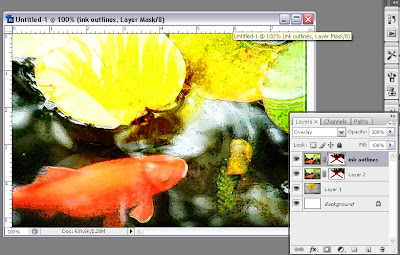
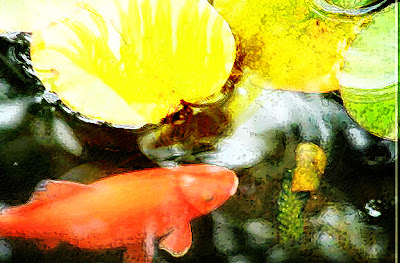
4.While I was making a decision about whether or not to reactivate the layer mask, I decided to play some more. I duplicated the layer (Ctrl/Cmd+J), then chose an artistic filter (Filter>Artistic>Brush Strokes>Ink Outlines), and set the blending mode to Overlay. Setting the blending mode to Overlay brightened the image quite a bit. Play with the blending modes to see what works for you.

I hope that you are enjoying these tutorials, that they make sense to you, and that you will be inspired to try them yourselves. Let me know by leaving a comment. If you post any of your work on your blog created after reading these tutorials, would you please reference this (or other tutorials) in your posting when you do?

Final image blending modes and layer masks - Sue O'Kieffe © 2007

Happy photoshopping.


© Sue O'Kieffe 2007
Saturday, September 08, 2007

PHOTOSHOP TUTORIAL - BLENDING MODES

Is it Sunday already? I hope everyone had a good week. For those of us in the northern hemisphere, fall is in the air. I love the shifting of the light that signals the final ripening of fruit on the vine and veggies in the garden.

So are you ready for another tutorial? I thought I would begin to talk today about blending modes. I think learning to work with blending modes in different layers is what makes Photoshop a fun program; it will also give you a lot of flexibility in your art and photo editing.

First I started with these two images from wetcanvas

water lilygold fish
I hope that by next week's tutorial I will have figured out how to post larger screen shots on Blogger. If you want to look at these images in more detail, please click on them to see the larger format.

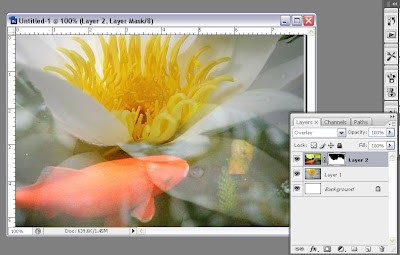
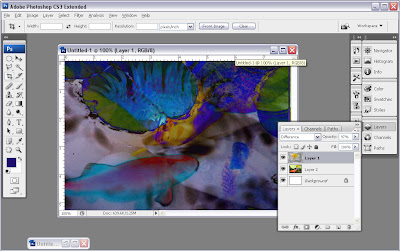
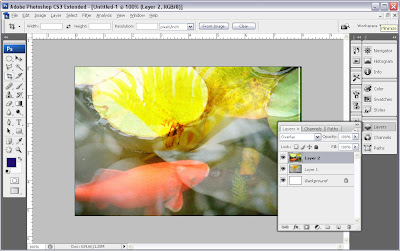
step 11. First I created a new canvas (Ctrl/Cmd+ N or File> New) and moved both images by dragging and dropping them using the Move tool (press V) on to the new canvas. From the layer palette you can see that I stacked the goldfish image on top of the water lily; then I set the blending mode to Overlay.

layer palette2. Here is a close up of the layer palette. I have pointed to the blending mode window, in case you weren't sure where it was. If you click on the drop down menu, you can see all the different blending mode choices. There are many books and resources available that explain better than I can how these blending modes work. I am partial to the writing of Ben Willmore, and suggest you check him out for more in depth explanations. Not only does he know his stuff, but he writes in an engaging manner that makes learning Photoshop fun.

step 23. I wanted to do a little more experimenting before I decided how to proceed, so I reversed the layer order and put the water lily on top of the goldfish in the layer stacking order, and I changed the blending mode on the water lily layer to Difference. I like the moody affect, but decide I'd rather go for a more traditional orange gold fish look.

step 34. I moved the two layers back to their original positions, set the blending mode on the top layer back to Overlay and created a layer mask. I did this so parts of the gold fish image would be blocked out (masked), thus revealing parts of the water lily image from the layer below. If you click on this image you can see in greater detail how this layer mask works. Where the goldfish layer is painted in black, the water lily is revealed. Remember the basic Photoshop mantra? BLACK REVEALS AND WHITE CONCEALS

Instead of waiting until next Sunday to finish up this tutorial, I will post part 2 on Tuesday -- when I will talk in more detail about combining blending modes and layer masks. I really would encourage you to download the two images from
wetcanvas and follow along with this tutorial. Oh, and if you want to see where I took this image after I finished the tutorial, you can see them at my other blog here.


© Sue O'Kieffe 2007
CIRCLES OF LIGHT

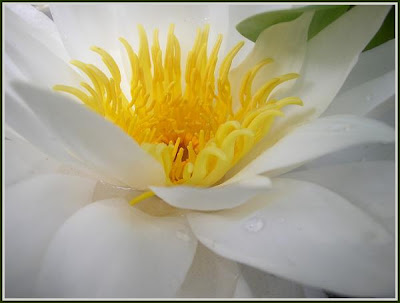
star lightStar Light Mandala - (Circles of Light series) - © Sue O'Kieffe 2007

I decided to continue exploring the theme of dark and light that I have been investigating in my recent mandalas. I love the richness of the dark and moody colors found in this penstemon wilcoxii I photographed and transformed into a Circle of Light. I wasn't quite satisfied with my usual plain dark background, though, but also knew I didn't want to clutter the image with a lot of extraneous detail. So I created another mandala from an image of amethyst that my friend dosmangoes photographed and has been letting me use. I like the very subtle revelation of light coming through from the dark plum-hued background.

Yesterday Rima Koleilat of Maraya Galleries asked me if I ever get tired of hearing superlatives about my work. I can't imagine anyone who doesn't like some kind of recognition. My biggest desire is that my art will calm, soothe, and inspire. It is what keeps me going on those days that are dark for me too.

Thursday, September 06, 2007

DARKNESS AND LIGHT

birth of a star
Birth of a Star - (Earth Mystery Series) - © Sue O'Kieffe 2007
------------

Confront the dark parts of yourself and work to banish them with illumination and forgiveness. Your willingness to wrestle with your demons will cause your angels to sing ~ Angus Wilson

I love the simplicity and depth of this mandala. It is another image created from a photograph of mussel shells and barnacles. I like the black and white and the shine of golden yellow coming from the center and radiating outward into the cosmos.

May we all shine forth!


Tuesday, September 04, 2007

OCEAN MANDALAS

shellbots worship the heavensShellbots Worship the Heavens - (Earth Mystery Mandalas) - © Sue O'Kieffe 2007

I spent some time at a local beach here on the North Coast of California this weekend. The changes that occur from visit to visit are subtle yet profound. The last time I went I don't remember the huge rocks on the beach being covered so profusely in goosenecked barnacles or mussel shells.

It never fails that when I create a mandala from earthy or seabound resources, something other worldly appears. I see intergalactic entities worshipping the skies above.

What about you?

Sunday, September 02, 2007

PHOTOSHOP LAYER MASK TUTORIAL

Well, here it is Sunday again, and time for another Photoshop tutorial (insert theme music here)...

I thought I would introduce the concept of layer masks and hope it does not look too overwhelming. I am presenting it in 11 easy steps, and think if you try it for yourselves you will see it is not as daunting as it appears at first glance. Really.

One of the most important concepts to understand about making adjustments through the layer palette (as opposed to selecting Image>Adjustment) is that layer palette adjustments are non-destructive... that is, you can edit and re-edit the individual layers and still retain the original integrity of the image. In the long run, though creating layer masks may seem like a tedious process, it also gives you more room for creative play.

1. For the purpose of this tutorial, I chose two images with strong contrast in content from the website wetcanvas
2. Create a new file and move each image onto it. You may need to rename the individual image layers from Background to an editable layer by clicking on it in the layer palette and changing the name to Layer 0.


3. Stack the layers so the swan layer is above the brick wall layer.


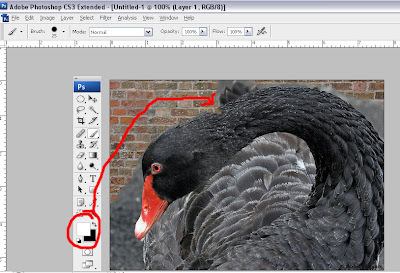
4. Click on the swan layer to make it active. Click on the 'add layer mask' icon in the layer palette. Click on the white box to activate the layer mask. You will see a black square around the white box which indicates the layer mask is activated.

The other important thing to remember when working on a layer mask is that BLACK REVEALS AND WHITE CONCEALS.

Press D to set foreground and background colors to default settings (black foreground and white background)


5. Press B to choose the paintbrush tool. (Did you know that you can increase the size of your paintbrush by pressing the right bracket ] and decrease it by pressing the left bracket [ keys?) I like to start with a paintbrush at about 100 px. Make sure the layer mask window is active by clicking on it, and begin painting on the image with black. You will see the brick wall in the first layer begin to be revealed.


6. Looking at the layer palette, you can see that where the image is painted in black the brick wall is revealed.


7. What if you make a mistake and reveal more of the brick wall than you intended and give the swan a neck reduction? No worries!


8. Press X to set white to the foreground color (the X key is a toggle that sets the foreground/background colors back and forth) and paint to conceal the unwanted brick wall.


9. If you want to turn off the layer mask, place your mouse pointer over it, hold down the shift key and click. To turn the layer mask back on, repeat. Shift+ click is also a toggle key.


10. This is what the final masked image and layer palette looks like.


11. Ta da!

If you have any questions about this tutorial, please be sure to let me know. If any of you reading who have used this technique have anything to add, speak up please! The more the merrier. Really.

© Sue O'Kieffe 2007