Pages

Showing posts with label tutorials. Show all posts

Monday, May 19, 2008

PHOTOSHOP TUTORIAL - EXPERIMENT WITH BLENDING MODES

Desert Sun Mandala - © Sue O'Kieffe 2008
source image - escobaria cactus

When I go out into the world with my camera, I love getting up close to nature, feeling the energy of the plants and reveling in their colors.

Last week at the local Farmers' Market, I took a photograph of this cactus, which I think, after a quick Googling, must be a variety of escobaria.

I was attracted to the spikiness of the plant and knew that it was a force to be reckoned with. Is it any surprise that feng shui practitioners recommend having cactus outside the house as a form of protection, but not to put it inside unless you want to keep people away? I imagined all those porcupine-like spikes would transform themselves into amazing geometric forms.


Yup. But I just was not satisfied with the background. One of the things I am focusing on right now in my art is experimenting with different ways of creating more interesting backgrounds without overwhelming the mandala imagesthemselves.

One thing I love about digital art is being able to reuse certain design elements over and over again. I have lots of handmade paper that I scanned onto my hard drive just for this purpose.

First iteration. Old antique paper from India. I liked the color and the texture, but wasn't happy with the lack of contrast between image and background.
Second iteration. Again, still not quite right but closer.

I love playing with blending modes. It is, for me, the primary feature in PhotoshopI use to make my images painterly. When I selected Screen mode for both of the paper layers (see layer palette), all of the unwanted dark features of both paper layers lightened up, leaving a blend of the two layers of paper while removing the texture and darker colors in the onion paper layer. (Antique Paper layer >Blending Mode: Screen>Opacit :54%, Onionskin Paper layer> Blending Mode: Screen>Opacity: 100%)
Final step?
Adding a black frame around the image as I described in this tutorial.

I love the way this mandala came together. Earthy. Bright. Sunny. Desert-y. I think the cactus would be happy with my portrayal of its many gifts.

I hope you enjoy experimenting with Blending Modes. Please feel free to let me know if you have any questions, either via email or in comments.
Sunday, February 17, 2008

PHOTOSHOP TUTORIAL:COPY AND PASTE SELECTIONS

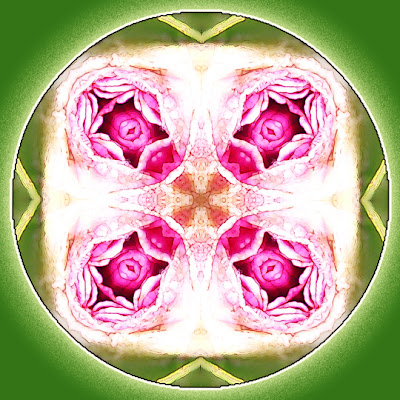
It's been a while since I've written a Photoshop tutorial, and so I thought I would start again with the simple concepts of making selections with the marquee tool, then copying and pasting those selections into new layers to create a multi-layered digital quilt. This image could then be taken in many different directions. You could refer to earlier tutorials I have written for further inspiration. (Hey, I used this process to create texture for the mandala I posted for my Valentine's Day mandala.)

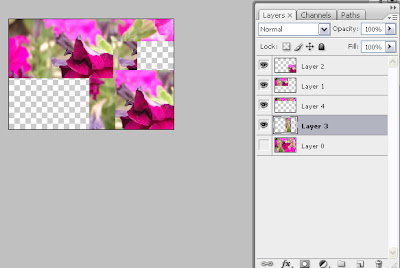
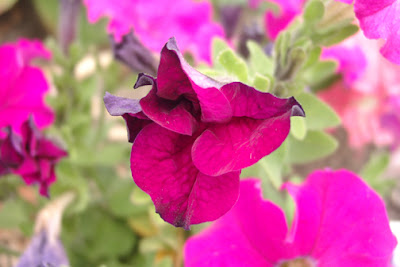
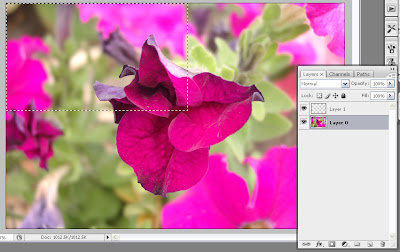
petuniaI started with this image of petunias, created a selection using the marquee tool (press M), then copied(ctrl/cmd+C) and pasted (ctrl/cmd+V) into a new layer. Everytime you paste your copied selection, it creates a new layer.
step1
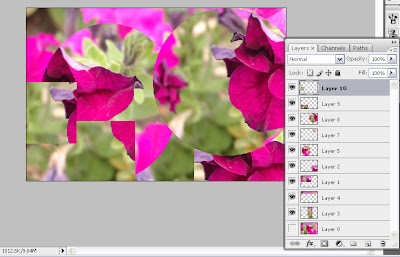
I built different layers of the quilt using different sized selections from the original background image. Don't forget to change the name of the background image to Layer 0 (double click on Background layer to change the name) or duplicate the layer (ctrl/cmd+J).

step2
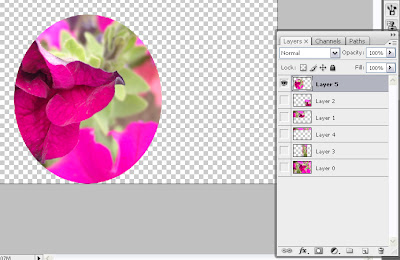
I decided to experiment with oval selections as well...
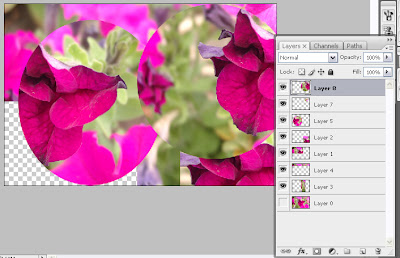
step3...and kept building layer and layer until the canvas was full
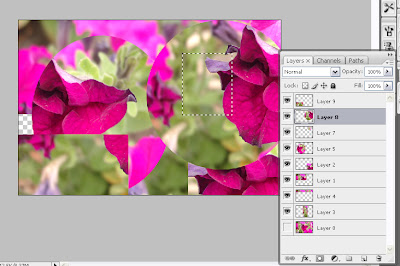
step4This last selection will go onto that blank spot on the left down there!
step5Now that all the blank spaces are filled in, I can begin having fun!
step6

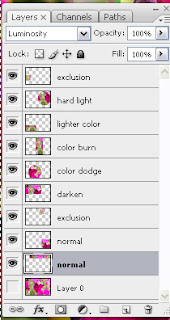
final layer palette
This is the layer palette for the final image below. As you can see I experimented with different blending modes for each layer. I like to name each layer with the name of the blending mode I used (double click on layer and rename it.) I wrote previously about blending modes here and here. I rely on this feature heavily in my art.

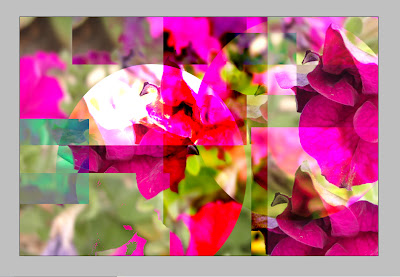
The final image, my digital quilt, is below. It is really just a jumping off point for whatever you might chose to do next. It is my understanding that anyone using Photoshop Elements or Photoshop Essentials has the capacity to use blending modes. The other tools and commands go back at least as far as Photoshop 5.


petuniad"Petuniad, A Digital Quilt"

Please feel free to use this final image however you want. If you do, please be sure to let me know what further alterations you made and link back to my blog. I always enjoy seeing what other people are doing.

And hey, if you enjoy my tutorials and have even learned a little something along the way, won't you consider making a donation to the cause? Tipping is not just a city in Peiking!

Happy Photoshopping!
© Sue O'Kieffe 2008


Sunday, January 13, 2008

PHOTOSHOP TUTORIAL:PATTERNS

One handy dandy little function of Photoshop I enjoy playing with from time to time is creating my own patterns. It is a technique I used on the background for this mandala that I showed earlier in January as part of my Holiday Mandala series.

step 1I liked the finished image above but thought the background was kind of boring, so I wondered what a pattern isolated as a selection from the mandala would look like. I am a big fan of texture in my work, and making patterns is another way to create it. This is how:
  • Using the rectangular marquee tool, make a selection in some part of the image you want to use for your pattern. I selected the center square portion of this mandala for my pattern.
  • Go to Edit>Define pattern and click enter
  • Name the pattern
  • Double click on background layer to access Layer Styles. Click on Pattern Overlay.
step 2
  • Click on the pattern window and choose the pattern you just created.
  • Adjust scale slider until you find the size of the pattern you like. Adjust blending mode and opacity levels.

step 3For this image I moved the scale slider to 420% so that the pattern was almost obliterated. I also placed a clipping mask adjustment layer (photo filter>green) above the background layer to mute the color of the background.

I have used this technique in Photoshop versions CS-CS3. Steps may vary with earlier versions of Photoshop, but Im sure the technique is available in earlier renditions. Have fun playing with this little trick and be sure to let me know if you have any questions.

Happy Photoshopping!

© Sue O'Kieffe 2007


Sunday, December 23, 2007

PHOTOSHOP TUTORIAL: CLIPPING MASKS

Well, it has been a while since I've done a Photoshop tutorial. But as I promised in my post yesterday, I said I would deconstruct how to make a mandala prayer flag. I have covered most of the steps I used to create one of these flags in previous tutorials, but I have never talked about clipping masks. Don't worry; they are easy as can be!

So first I drew a doodle and colored it using crayola and caran d'ache neocolor II crayons and scanned it to my hard drive.

For those of you who have followed my blog for a while, you probably know by now I use the templates on this website to create my mandalas. I feel a debt of gratitude to Komra Mokiro for her visionary approach to using Photoshop in this process.

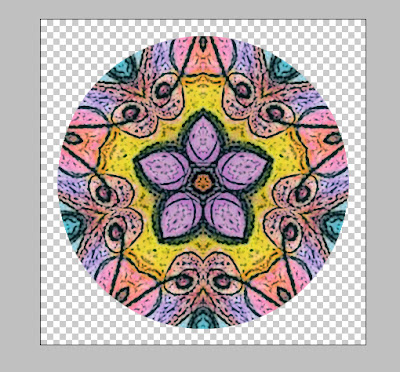
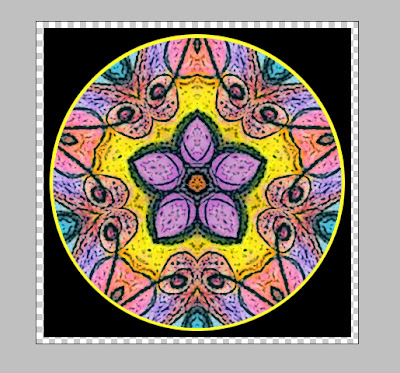
This is the basic mandala I created using the five wedge template found on the Earth Mandala website.
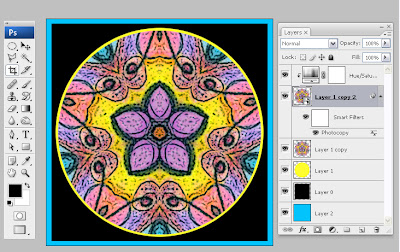
I duplicated the image (Ctrl/Cmd+J) , pressed D to set the colors to default, applied the photocopy filter (filters>sketch>photocopy), setting the detail at 2 and the darkness at 27. Then I set the blending mode to Multiply, which created the dark outlines in this image.
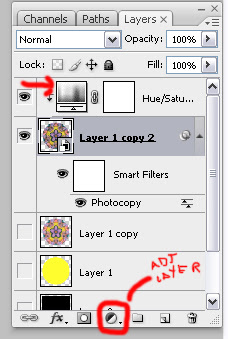
I thought the image looked a little dull, so I decided to use a Hue/Saturation adjustment layer to boost the intensity a bit. I only wanted it to affect the layer with the photocopy filter. Otherwise the adjustment layer would affect all of my layers! This is an important concept to understand when working with adjustment layers and considering their placement in your layer palette.

In order to create a clipping mask hold down the alt/option key, press the adjustment layer icon and select Hue/Saturation adjustment.

Tick the box that says:"Use Previous Layer to Create Clipping Mask" As you can see the Hue/Saturation adjustment layer is indented. This show it relates to only the layer underneath it. A regular adjustment layer affects all layers below it.

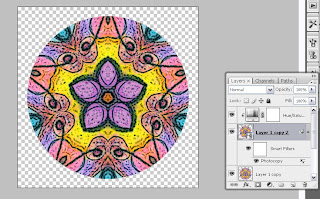
Using Hue/Saturation, set Hue at 2 and Saturaton at 26. The yellow center is most noticeably more vibrant.
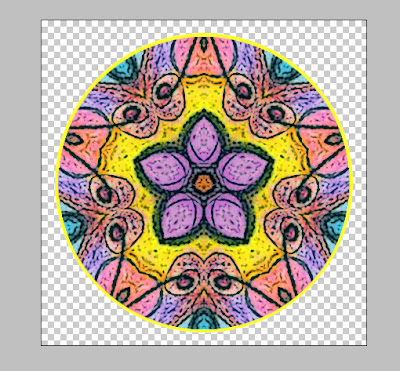
I created a new layer and chose the elliptical marquee tool. Holding down the alt/opt key and pulling upward from the center of the mandala made the selection I was creating into a perfect circle. I wanted the circle just a little larger than the circle of the mandala. Go to Edit>Fill and fill the selection with yellow.

Double click on the background layer, change the name to Layer O and fill it with black (Edit/Fill). Create a new layer, and reverse the order of the layers in the layer palette, so Layer 2 is on the bottom and Layer 0 is above it. Highlight Layer 2 in your layer palette. Select Layer 2 using the crop tool (Ctrl/Cmd+C) . Hold down the alt/option key in order to expand the size of your square so it is equal on all sides.
Fill Layer 2 with a bright turquoise color.
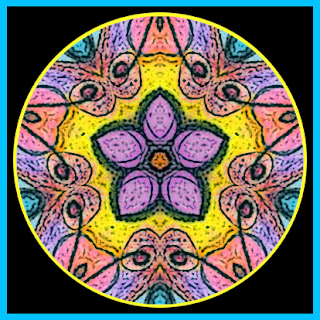
Here is the finished image.

If you have any questions about this tutorial, be sure to let me know. I hope you all have a wonderful holiday. I will return with more Photoshop fun in 2008. Thank you all for continuing to inspire me in this journey of creation.

Happy Photoshopping!

© Sue O'Kieffe 2007


Sunday, October 14, 2007

PHOTOSHOP: MASK REVIEW, MOVE AND NUDGE TOOLS

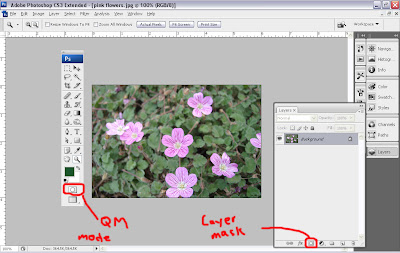
I thought for today's tutorial I would do a (very) short review on the subject of masks (since Halloween is not far away). Mostly I wanted to mention, in case there is any confusion, that there is a difference between quick masks and layer masks and how you access them.


Here is my really professional looking screen shot showing the layer palette with the layer mask icon circled and the tool palette with the quick mask mode icon circled. I have been told that the CS3 toolbox looks a little different from other versions. If you have a standard mask button in your toolbox, it is another masking function. I need to do research on its function. If you have any more questions about these two different kinds of masks, please check the tutorials here and here.
----------
I have two favorite Photoshop tools. One is the Move tool (press V) and the other is the Nudge tool. Press N? Nope. Press N, and, at least in my version, up pops a little yellow note pad (which is also a great little tool to use from time to time, if you want to write notes to yourself on how you performed this really cool effect so you will know next time)

Both the Move tool and the Nudge tool are great tools to use in mandala making and also in collage and photomontage assembly. The Move tool is pretty self explanatory. How else would you move things around on your digital canvas? But the Nudge tool helps to get things just perfect.

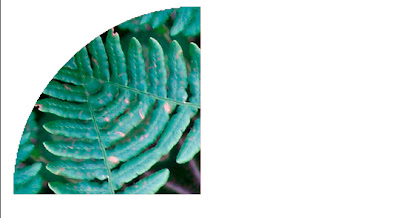
This is a screen shot of the first quarter of a mandala I am making. I want all the fern leaves to be perfectly lined up, and on first glance it looks pretty good. In looking at it closely, though (click on the image to see the larger version) you can see that the bottom fronds are a little out of alignment). This is where the Nudge tool, craftily hidden in your up, down, left and right arrows on your keyboard, comes in handy.

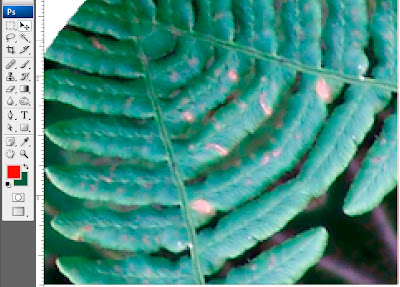
This zoomed in version makes it a little easier to see the misalignment and also the jaggies created by the template I use to make mandalas.
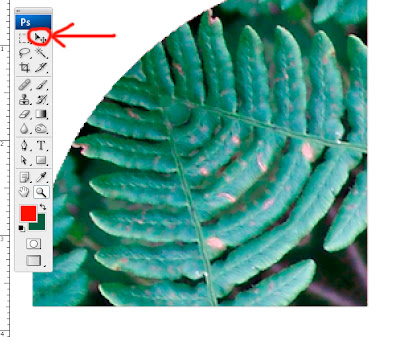
  • First activate the Move tool (Press V or Select Move tool in tool box). The Move tool must be selected in order to use the Nudge tool.
  • By using the Nudge tool, I can Nudge the second quarter into place (down arrow, right arrow). By using the Move tool or the Nudge tool, I can move the second quarter to the place where everything is lined up perfectly and you no longer see those annoying jaggies, which will become most visible if you print your image.

This should give you a little bit of insight into these two most versatile tools. I hope you enjoyed this week's Photoshop tutorial. If you have any questions, or want me to cover any other topics, please let me know.

Happy Photoshopping!

© Sue O'Kieffe 2007


Saturday, October 06, 2007

COLORIZING PHOTOGRAPHS

When I first began to work in Photoshop, I became interested in the field of photo restoration. It's something that still interests me and I may some day go back and look at it again.

For today's tutorial I thought I would demonstrate one way to colorize photographs that builds on skills learned in other tutorials I have posted. We will also use quick mask mode and adjustment layers in this tutorial. You can review those tutorials here and here (I will be honest and tell you that I am borrowing the instructions for this from an assignment written by my photoshop instructor Jim Pegoda.)

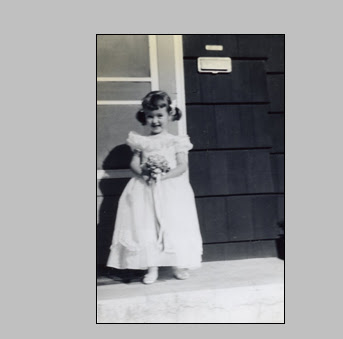
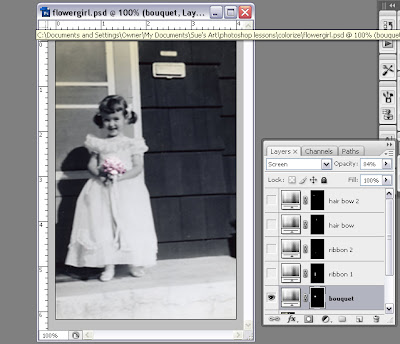
flower girlI started with this photograph of a cute little girl (guess who?) in her flowergirl dress. In order to colorize a photograph, it must be in RGB mode. This particular photograph was already black and white, so when I scanned it to my hard drive, it was in RGB mode by default. If you want to convert a color photograph to black and white and then colorize it, this is how to do it:
  • Go to Image>Mode>Greyscale
  • Then, since your greyscale image must be in RGB mode, go to Image>Mode>RGB
With quickmask mode set to Color Indicates Selected Areas,(double click on quick mask mode button) paint black paint with a soft brush over an area that you want to colorize. Switch to Standard mode (press Q) and with your selection active, create a Hue/Saturation adjustment layer. Click the colorize checkbox and adjust the Hue/Saturation sliders as needed.
For this particular adjustment layer I set Hue at 331 and Saturation at 31.

step 1
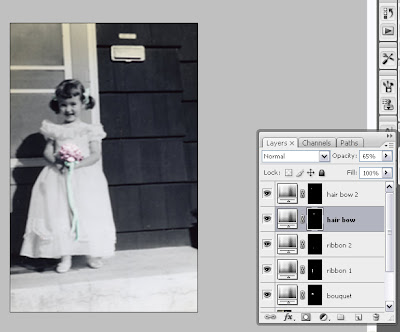
Use this method to create a new Hue/Saturation adjustment layer for every color you want to apply to an image.
step 2
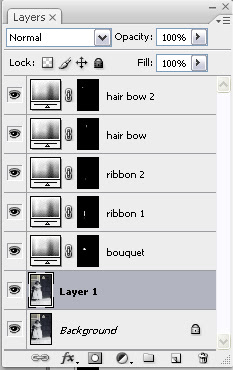
Below is a capture of the entire layer palette for the colorized image

step 3
Once the adjustment layer is created, you can adjust the opacity and/or blending mode and change the color by double clicking on the adjustment layer icon.

If you have a question about Photoshop you would like me to address, please be sure to email me or leave me a comment. I would love to hear from you.

That's it for this Sunday. Have a great week!

Saturday, September 29, 2007

WHAT ARE PHOTOSHOP ADJUSTMENT LAYERS?

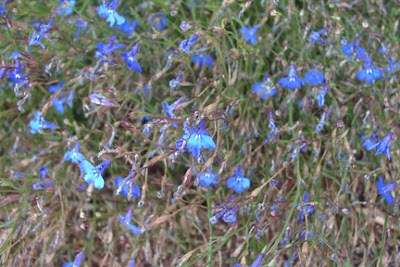
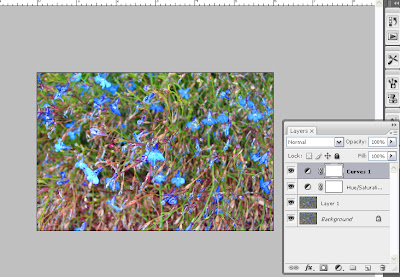
I'm glad to be back after a week's hiatus to offer another tutorial in Photoshop. Today I thought I would talk a little about adjustment layers and the concept of non-destructive image editing. Please feel free to copy this photograph I took of lobelia in order to follow along.


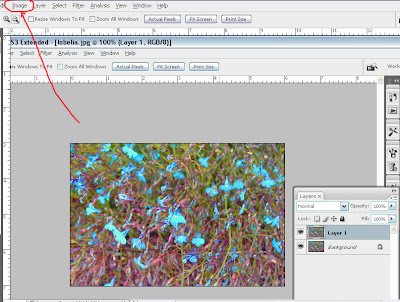
1) There are many different ways to edit your images. First be sure to duplicate your image (Ctrl/Cmd+J) so you will have an original of the image you are editing. Go to Image>Adjustments; you will access a long menu of different adjustment tools. For the purposes of this tutorial, I am going to use the Hue/Saturation adjustment tool.
I wanted to see if I could give the flowers in the photograph a little more pop, so I set Hue at -3 and Saturation at +52 and clicked OK. But what if, after working on this image for a while, I wanted to make another adjustment to the color? If you click on the Hue/Saturation tool again, you will see that the settings have all returned to 0. Any further adjustment would be destructive to the layer you are editing. What to do? Let's start over.

Go to Windows>History> click on Open. This will take you back to the beginning. Duplicate the image again.

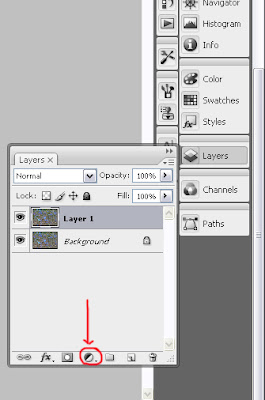
2) If your Layers Palette isn't open, do it now (Windows>Layers). The Layers Palette also contains many different tools. The button I have circled in red creates new adjustment layers. Click it now and you will see the same menu of tools you did before. The difference with adjustment layers is that you can go back and re-edit your adjustments, turn them off and on, delete them, re-create them. This gives you an amazing amount of flexibility in your work.


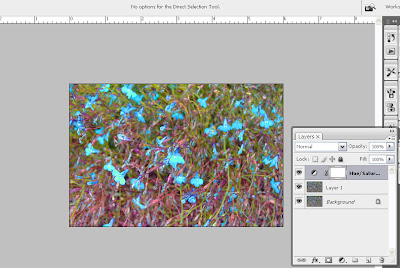
3) Once again, select Hue/Saturation and once again set Hue at -3 /Saturation at+52 and click OK. Now click on the Hue/Saturation adjustment layer again. You will see that the H/S settings are -3/+52. Change them to -8/+42 and click OK. As you continue to edit this image, you can go back and make adjustments to these settings as needed.


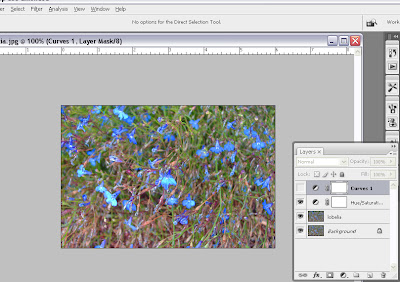
4) Click on the adjustment layer icon again and select Curves. It's OK if you have never used Curves before; for the purpose of this tutorial enter the following adjustments: output 55/input 64.
5) Now turn off the Curves adjustment layer by clicking on the eyeball column on the left. Do you like the image better with or without the Curves adjustment?

Have fun playing with adjustment layers. Try other adjustments. See how they look. Try them with different blending modes. Experiment. See what happens if you mask out part of the adjustment. Remember that my screen shots might look different from what you see on your monitor, depending on what version of Photoshop you use. The concepts remain the same.
Let me know if you enjoyed this tutorial and how it changes (if it does) the way you edit your images.

Happy Photoshopping, everyone!

© Sue O'Kieffe 2007


Tuesday, September 11, 2007

MANY THANKS

Earth Dance Mandala - (Earth Mysteries Series) - © Sue O'Kieffe 2007

Expressing gratitude is an expansive spiritual practice that allows the flow of life's energy to remain vibrant and alive. I wanted to take some time today to say thank you to a few people out in the blogosphere who have touched my life, influenced my thinking, assisted in my process, and gosh darn it all just made me feel good!

I think I found a link to ArtBizCoach Alyson Stanfield first @ www.theartrepreneur.com back around the beginning of the year, and I have been reading her blog and newsletter ever since. If you have never read her, I would definitely recommend checking her out. Alyson is a great resource of information for learning more about the business of art. I thought her recent post about dissecting what makes a good artist's blog especially thought provoking. Read it and find her recommendations of other artists' blogs to fall in love with. I've already subbed to a couple of them and look forward to reading their stuff!

www.artbizcoach.com
www.artbizblog.com

In accordance with the mystery of the Universe we call the world wide web, I can't remember exactly how I bumped into Tammy Vitale's blog Women, Art, Life: Weaving It All Together. Tammy is also writing about kicking her art business up another notch, as well as showing off her stunning ceramic masks, torsos and beads. She is a woman after my heart, and I enjoy reading about her journey.

My friend Judi Singleton has started a new internet venture on the Law of Attraction. If you have read The Secret or enjoyed the movie What the Bleep, you would probably enjoy her email course on this fascinating topic.

www.newsecretslawofattractions.com

And finally I want to extend a bear hug of gratitude to fellow photoshop adventurers Rima Koleilat of Maraya Galleries and Bobbie of Great Grannie's Blog for letting me know that my photoshop tutorials made sense to them and were easy to follow. Check out their artwork here and here.

Monday, September 10, 2007

BLENDING MODES - PART 2

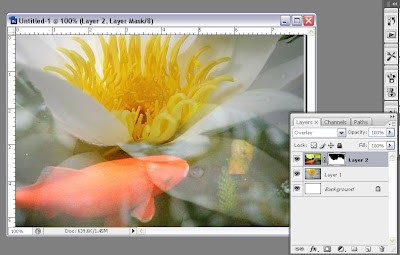
I introduced the concept of layer masks in September 2nd's tutorial. In the tutorial on September 8th, I ended it using a layer mask, and that is where I am picking up for part 2 of this tutorial on blending modes.

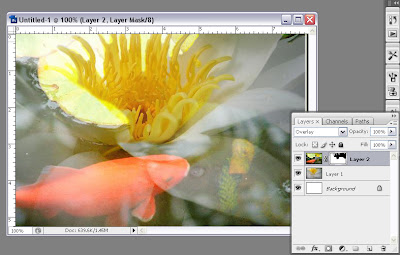
1. If you look at Sunday's tutorial, you will see that I started working with this layer mask to play with concealing some of the lily pads. I did this by setting the foreground to black (Press D then X) and painted (or masked) them out the lily pads. BLACK CONCEALS AND WHITE REVEALS, remember? The other thing about working with layer masks that is important to remember is that you are working non-destructively. You can resurrect and restore anything you are not pleased with.
step 1
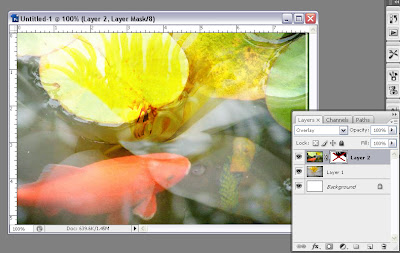
2. I wondered what it would look like if part of the lily pad showed through instead of it being masked out. Press X (which is a toggle key for setting the foreground and background colors) to make white the foreground color, then paint on the lily pad to "erase" the black of the layer mask. But really, you arent erasing as much as you are restoring. You could mask that lilypad again by painting it with black. Is this beginning to make sense now?
step 2
3. Sometimes I don't want to make a decision right away. It's easier just to turn off the mask for a while instead of masking and remasking. You do this by pressing the shift key and clicking on the mask, which is what I did here. (To turn the mask back on, do the same thing).
step 3
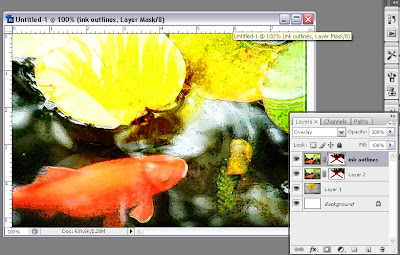
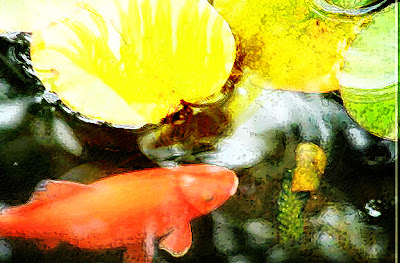
4.While I was making a decision about whether or not to reactivate the layer mask, I decided to play some more. I duplicated the layer (Ctrl/Cmd+J), then chose an artistic filter (Filter>Artistic>Brush Strokes>Ink Outlines), and set the blending mode to Overlay. Setting the blending mode to Overlay brightened the image quite a bit. Play with the blending modes to see what works for you.

I hope that you are enjoying these tutorials, that they make sense to you, and that you will be inspired to try them yourselves. Let me know by leaving a comment. If you post any of your work on your blog created after reading these tutorials, would you please reference this (or other tutorials) in your posting when you do?

Final image blending modes and layer masks - Sue O'Kieffe © 2007

Happy photoshopping.


© Sue O'Kieffe 2007