Pages

Tuesday, October 30, 2007

MANDALA FOR THE CELTIC NEW YEAR

Transistions Mandala - (Seasons Series) - © Sue O'Kieffe 2007
Source image: lilac leaf

Sometimes I am lucky to be able to watch a plant in different phases of the growing season. A friend of mine has a luscious garden. This year her lilac bush flowered for the first time since being planted, and the photograph I took of its flowers gave me this mandala.

I had no idea how beautiful their autumn leaves were until this year. It is such a pleasure, as an artist and participant in nature, to be able to witness this beauty and soak up this energy like some animals store up food for winter.

This time of year is significant to me. Two years ago I started blogging here. In Celtic tradition, the end of October and beginning of November mark the end of harvest time and the beginning of the descent into winter. It's a good time to take stock and review all that we have accomplished. This time last year I was facing major surgery. Today I am in start up phases of a new art business and nurturing life long dreams. I am grateful for all that life has shown me so far and will continue to show me moving forward.

I've been amiss in visiting most of my readers of late. I will come by and say hi as soon as I can.

Happy New Year, everyone!
*Tossing dried leaf confetti in the air*


Sunday, October 28, 2007

WHAT'S NEW WITH SUE O'KIEFFE

Conduit of Light - (Circles of Light series) - © Sue O'Kieffe 2007
Source image : Bamboo

I am a member of an Artists in Business group sponsored by our local Small Business Development Center. It has been a wonderful opportunity for me to be introduced to a lot of different information about business, which I suspect is really only scratching the surface of what there is to know. Last Tuesday I met with Victoria Ryan, a local artist and art marketing consultant, because I was not able to get to the meeting when she spoke; I was treated to two hours of personalized information. We talked a lot about licensing my art, as opposed to focusing on gallery representation, blogging, and multiple streams of income. These are directions and goals I had already decided upon for myself, and so it was good to get that validation.

On Friday I met with my business counselor, who also comes with this program. As I was leaving the coffee house, I took photographs of the bamboo growing outside and created the mandala that you see above. I do see myself as a conduit for the everyday beauty around me, and I am grateful for all that there is to see.

For those of you who do digital art and photography, I want to share this information: Snapshots 2007 Open call for entries for an un-juried show featuring digital art and photography: All entries received by the deadline will be exhibited in our gallery arranged mural-like, edge to edge. More info here.


Saturday, October 27, 2007

PHOTOSHOP:MORE ABOUT MASKS PART 2

I recently learned another cool application demonstrated by Sara Francis for using layer masks. Layer masks are used to mask out details on a top layer by revealing details on the layer underneath it. Start with your beginning image and duplicate it (ctrl/cmd+J). With the duplicate layer highlighted, go to Filters>Blur>Gaussian Blur and set the sliders to around 25. You will have a very blurry layer.

In your options bar, choose a large soft brush, and set the opacity and flow levels at 30% each.
Select the layer mask icon on your layer palette and press D to set black/white to default position.
With the white layer mask window selected, I began to paint with black to reveal the image in the bottom layer. This image looked pretty good, but I thought I would try something else to play a little further.
So I dragged in an image of clouds, turned off the blur layer and created another layer mask with the cloud layer.

And put my head in the sky.

Turning the blur layer on and playing with blending modes took me here.It's all about having fun!


For those of you who have seen the art of Maggie Taylor, she uses this process of multiple layer masks in her digital collages. It's a skill worth nurturing.

And yes! I am the masked woman.

Happy Photoshopping everyone.
Questions? Requests? Let me know.
I want to hear from you.

© Sue O'Kieffe 2007


Wednesday, October 24, 2007

PHOTOSHOP: MORE ABOUT MASKS PART 1

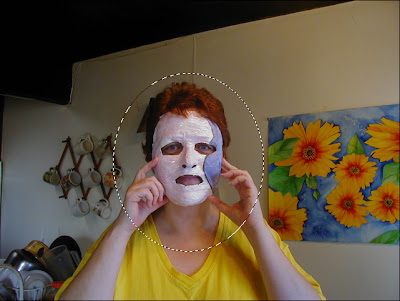
Who is this masked woman?

I have been asked to write more about masks with an explanation of when to use a quick mask and when to use a layer mask, and so I thought I would demonstrate with a series of masks using another mask that I made, in this two part tutorial

In Photoshop, Quick Masks are a way to make selections precisely. There are different ways to approach making selections, which requires a basic understanding of the selection tools in Photoshop's toolbox . For demonstration purposes, let's say I wanted to make a selection of just this woman's face.

When you click on the quick mask mode icon this window comes up.
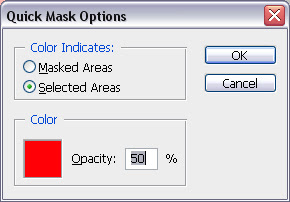
If you choose the Selected Areas button, this is the result:


If you choose the Masked Areas button, this is what happens:
Essentially, Quick Masks are another way to make selections. The advantage of using a quick mask rather than other selection tools is they are more precise (with practice). The other advantage is that you can paint away places in your mask making that you don't want to be part of the selection. Don't get confused now. Just follow with me.

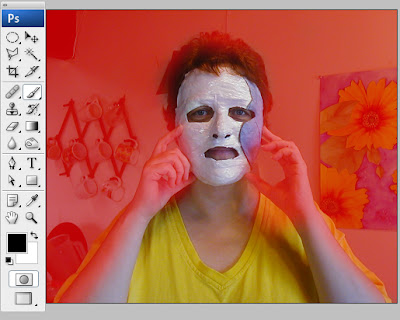
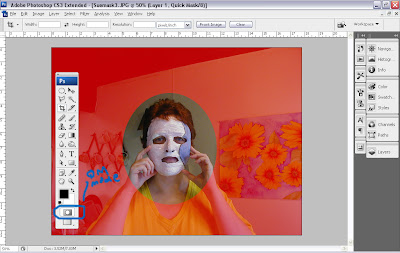
I decided I wanted to select the background in this image and leave the figure unaltered, so I went into quick mask mode (press Q or click once on the quick mask mode icon.) I painted the background with the mask color and didn't really worry about painting on the figure itself.

When I press Q again (or click on the standard mode button), I exit quick mask mode and the selection I just painted becomes visible.
  • Enter quick mask mode again
  • Press D so foreground and background colors are set to default.
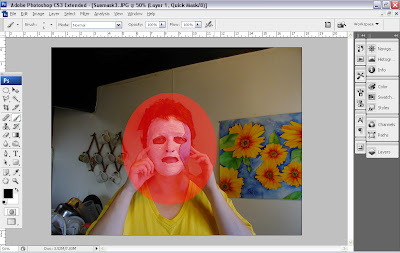
  • REMINDER: Black reveals and white conceals. This is a basic Photoshop mantra. Choose a paintbrush of medium softness and paint with black and white to adjust mask as necessary. Paint black to remove red mask where you don't want it and white to add red mask where you do.
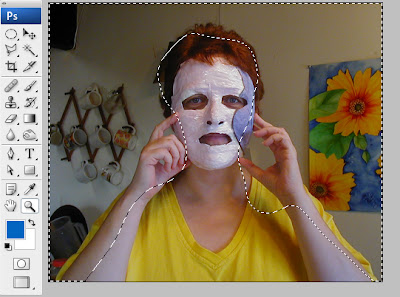
When I was happy with the mask the selection looked like this:
DID YOU KNOW YOU CAN SAVE SELECTIONS? They often take a lot of time to create, so it's always good to create a *backup*. Go to Selections>Save Selection. You can call it up anytime then, even after you close the file.

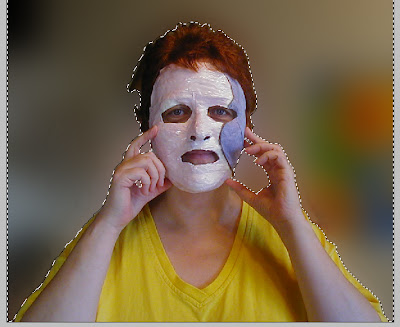
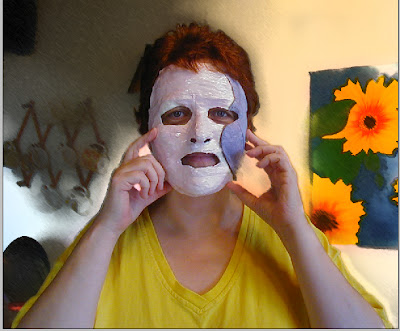
In the image above I went to Filter>Blur>Gaussian blur and set the slider to 40. Then I thought I'd try something different, so I chose Filter>Blur>Surface blur, then Filter>Artist>Smudge Stick


Sunday I will follow up with a layer mask review.

If you have questions, please let me know. I'd love to hear from you.

Happy Photoshopping!

© Sue O'Kieffe 2007


HONORING BREAST CANCER AWARENESS MONTH

in the pinkIn the Pink - Healing in Circles series - © Sue O'Kieffe 2007
Source image: Pink hydrangeas

DID YOU KNOW?

The American Cancer Society estimates that in 2007, 178,480 women will be diagnosed with breast cancer and 40,460 die. One woman in eight either has or will develop breast cancer in her lifetime. In addition, 2,030 men will be diagnosed with breast cancer and 450 will die this year.

If detected early, the five-year survival rate for breast cancer exceeds 96%. Mammograms are among the best early detection methods, yet 13 million U.S. women 40 years of age or older have never had a mammogram.

The National Cancer Institute and U.S. Department of Health and Human Services recommend that women in their forties and older have mammograms every one to two years. A complete early detection plan also includes regular clinical breast examinations by a trained medical professional. Monthly breast self-exams are suggested in addition.

Click here and here for more information about breast cancer and the issues surrounding it.

www.thebreastcancersite.com

The Hunger Site

Tuesday, October 23, 2007

HEALING WITH ART

heart wisdomHeart Wisdom - (Healing in Circles series) - © Sue O'Kieffe 2007
Source image: Rosa california

A year ago I had surgery on my carotid artery. It had a major impact on my art as well as my life style. I don't talk a lot about my private life here. I do at my other blog, though.

I am making some shifts in my life. Nothing is solid yet, but I am being shown how great my need for more consistent income has become. The need for more social interaction is pretty high as well. Working in solitude has left me feeling pretty isolated.

I created this mandala during the early days of my healing journey. The one I posted on Sunday was created towards the end of the first stage of that journey and was donated to the local Breast Health Project for their assistance in helping me find initial funding that lead to my final diagnoses of benign carotid body tumor.


I wonder how many of us that work on the screen (or the canvas or clay or fiber) feel that isolation? What is your experience? And how do you cope/strategize to keep from feeling crazy?

Sunday, October 21, 2007

RADIANT HEALTH MANDALA

Radiant Health Mandala - (Healing in Circles series) - © Sue O'Kieffe 2007

Well, they safe life is what happens when you are busy making other plans. Photoshop Sunday is being postponed to another date TBA while I spend time at a friend's enjoying a hot tub, fall garden and two sweet kitties.

In the meantime, I thought I would offer this mandala for those out there I know are experiencing their own health concerns. This image, created from an agate scan, is full of grounding energy and radiant light.

Enjoy.

Friday, October 19, 2007

PATTERN MAKERS ON THE WEB

I have been using a handy feature that Google offers called Google Alerts, to have them search for instances of mandala art that appear on the web. I get alot of hits for Tibetan sand art, which really is fascinating, but I have been more interested in contemporary applications and how they are being used. This morning I wanted to point you in the direction of a couple of my recent finds.

Caterina Martinico creates mandalas using techniques developed by Judith Cornell. She also lives in Northern California, but a couple counties south of me. Go visit her blog here. She also does collage and wax encaustic painting.

Another mandala maker I encountered the more old fashioned way (by following a link on Andrew Daniel's blog to her artblog to her mandala blog) is the work of TeriC. You can view her gelpen mandalas here. Bright and colorful and fun. Say hi and tell her I sent you. She is also pretty geeky. Nothing like another techno-sister.

My favorite find recently, though, has been this art exhibit sponsored by Art and Science Collaborations, Inc. (ASCI) I have never really thought of myself as either a mathematician or scientist, but the more I work in digital art with images from nature, the more I recognize how it all blends together. This art show on pattern making is well worth taking the time to look at. I love this quote by Agnes Denes:

"Pattern-finding is the purpose of the mind and the construct of the universe. There are an infinite number of patterns, some of which are known; those still unknown hold the key to unresolved enigmas and paradoxes."
- Agnes Denes, 1967 (1)

Agnes Denes - Tree Mountain, A Living Time Capsule - ©2003


This could almost be a late submission for Blog Action Day as I am reading about her project:

A huge man-made mountain measuring 420 meters long, 270 meters wide, 28 meters high and elliptical in shape was planted with eleven thousand trees by eleven thousand people from all over the world at the Pinziö gravel pits near Ylöjärvi, Finland, as part of a massive earthwork and land reclamation project by environmental artist Agnes Denes. The project was officially announced by the Finnish government at the Earth Summit in Rio de Janeiro on Earth Environment Day, June 5, l992, as Finland's contribution to help alleviate the world's ecological stress. Sponsored by the United Nations Environment Programme and the Finnish Ministry of the Environment, Tree Mountain is protected land to be maintained for four centuries, eventually creating a virgin forest. The trees are planted in an intricate mathematical pattern derived from a combination of the golden section and the pineapple/sunflower system designed by the artist. Even though infinitely more complex, it is reminiscent of ancient earth patterns.
More here

There are some intriguing and inspiring mandalas and other patterns inspired by nature/science in this Digital '07 show on Pattern-Finding. I hope you take the time to look as a way of really seeing the overlays of science with art. Im going to add it to my digital art links as well.

I will be back on Sunday with another Photoshop tutorial. I 've had a request for more about masks. Is there anything else you would like me to cover? Be sure to let me know.

Sunday, October 14, 2007

BLOG ACTION DAY

blog action day imageWalk Gently on this Earth - Earth Mystery Series - © Sue O'Kieffe


PHOTOSHOP: MASK REVIEW, MOVE AND NUDGE TOOLS

I thought for today's tutorial I would do a (very) short review on the subject of masks (since Halloween is not far away). Mostly I wanted to mention, in case there is any confusion, that there is a difference between quick masks and layer masks and how you access them.


Here is my really professional looking screen shot showing the layer palette with the layer mask icon circled and the tool palette with the quick mask mode icon circled. I have been told that the CS3 toolbox looks a little different from other versions. If you have a standard mask button in your toolbox, it is another masking function. I need to do research on its function. If you have any more questions about these two different kinds of masks, please check the tutorials here and here.
----------
I have two favorite Photoshop tools. One is the Move tool (press V) and the other is the Nudge tool. Press N? Nope. Press N, and, at least in my version, up pops a little yellow note pad (which is also a great little tool to use from time to time, if you want to write notes to yourself on how you performed this really cool effect so you will know next time)

Both the Move tool and the Nudge tool are great tools to use in mandala making and also in collage and photomontage assembly. The Move tool is pretty self explanatory. How else would you move things around on your digital canvas? But the Nudge tool helps to get things just perfect.

This is a screen shot of the first quarter of a mandala I am making. I want all the fern leaves to be perfectly lined up, and on first glance it looks pretty good. In looking at it closely, though (click on the image to see the larger version) you can see that the bottom fronds are a little out of alignment). This is where the Nudge tool, craftily hidden in your up, down, left and right arrows on your keyboard, comes in handy.

This zoomed in version makes it a little easier to see the misalignment and also the jaggies created by the template I use to make mandalas.
  • First activate the Move tool (Press V or Select Move tool in tool box). The Move tool must be selected in order to use the Nudge tool.
  • By using the Nudge tool, I can Nudge the second quarter into place (down arrow, right arrow). By using the Move tool or the Nudge tool, I can move the second quarter to the place where everything is lined up perfectly and you no longer see those annoying jaggies, which will become most visible if you print your image.

This should give you a little bit of insight into these two most versatile tools. I hope you enjoyed this week's Photoshop tutorial. If you have any questions, or want me to cover any other topics, please let me know.

Happy Photoshopping!

© Sue O'Kieffe 2007


Friday, October 12, 2007

Demeter's Dream Mandala

demeter's dreamDemeter's Dream Mandala - (Goddess Series) - © Sue O'Kieffe 2007

I was in an introspective mood when I created this image, but then that's nothing really new for me. Sometimes I hear my art asking to be named in certain ways, and that is what this mandala did. The story of Demeter going to the underworld to rescue her daughter Persephone from Hades is one of my favorite myths.

I would be interested to hear what you see or feel in this image. (I didn't go to the Underworld, by the way; I've been working a temp job this week. It's good to be back)


Monday, October 08, 2007

HOLIDAY GREETINGS

festival of lightFestival of Light Holiday Card
© Sue O'Kieffe 2007

I spent most of last week in a card making frenzy. It's part of why I haven't been commenting much on other blogs. Im sure some of you must know how that is.

I spent a lot of time thinking about what the holidays mean, not wanting to focus on any one particular tradition but wanting to capture the essence of the season. I polled people on my other blog and wrote to the only two non-European women (Neda and Rima) I know for their take on the winter holidays; what I heard mentioned over and over were the themes of love, family, light, and closeness

I am happy, though, with the six cards I have created. I am still evaluating my finished product and hope to take them to the major retail gift shop soon that I have been drooling to have my work in for the last year.

If you want to see the other five cards you can see them on my other blog here (they are also linked to the right under My Greeting Cards.

I would love to read your comments. Your feedback and encouragement means alot to me.

Saturday, October 06, 2007

COLORIZING PHOTOGRAPHS

When I first began to work in Photoshop, I became interested in the field of photo restoration. It's something that still interests me and I may some day go back and look at it again.

For today's tutorial I thought I would demonstrate one way to colorize photographs that builds on skills learned in other tutorials I have posted. We will also use quick mask mode and adjustment layers in this tutorial. You can review those tutorials here and here (I will be honest and tell you that I am borrowing the instructions for this from an assignment written by my photoshop instructor Jim Pegoda.)

flower girlI started with this photograph of a cute little girl (guess who?) in her flowergirl dress. In order to colorize a photograph, it must be in RGB mode. This particular photograph was already black and white, so when I scanned it to my hard drive, it was in RGB mode by default. If you want to convert a color photograph to black and white and then colorize it, this is how to do it:
  • Go to Image>Mode>Greyscale
  • Then, since your greyscale image must be in RGB mode, go to Image>Mode>RGB
With quickmask mode set to Color Indicates Selected Areas,(double click on quick mask mode button) paint black paint with a soft brush over an area that you want to colorize. Switch to Standard mode (press Q) and with your selection active, create a Hue/Saturation adjustment layer. Click the colorize checkbox and adjust the Hue/Saturation sliders as needed.
For this particular adjustment layer I set Hue at 331 and Saturation at 31.

step 1
Use this method to create a new Hue/Saturation adjustment layer for every color you want to apply to an image.
step 2
Below is a capture of the entire layer palette for the colorized image

step 3
Once the adjustment layer is created, you can adjust the opacity and/or blending mode and change the color by double clicking on the adjustment layer icon.

If you have a question about Photoshop you would like me to address, please be sure to email me or leave me a comment. I would love to hear from you.

That's it for this Sunday. Have a great week!

Tuesday, October 02, 2007

AUTUMN HEARTBEAT MANDALA

autumn heartbeatAutumn Heartbeat Mandala - (Seasons Series) - © Sue O'Kieffe 2007

Safe in feeling excited learning risking trusting
Heartbeat
Friendly open loving kindly kind of beating
Heartbeat
Caring, honest, pulsing, grounding, present time now

Heartbeat

Beating like a work of art

The drumming of my heartbeat

~SOK

Monday, October 01, 2007

DIGITAL KALEIDOSCOPES

Clancy Kaleidoscopes - © Sue O'Kieffe and Diane Clancy 2007

Diane Clancy
creates some of the most colorful digital art I have ever seen. Like me, she is all about color; her art enhances the spirit. I feel most grateful that she bumped into me somewhere in the blogosphere. I think of Diane as a central part of my business network, too.

It only seemed like the next transformative step that some of her art be converted to mandalas. I knew her playful use of color and strong lines would lend itself well to this rendering.

And indeed it did. Thanks for providing me a little Sunday rainy day fun, Diane!

You can see her original art I used as source images here, here, here and here.
Sources: At the Opera, Inner Flow I, Turtle Batik, Life Expands I